How do I create Consumer Law Claim (CLC) documents?
In some regions, consumer law may offer additional coverage to a customer. If a customer is eligible for consumer law coverage, you can easily create the appropriate documents in Fixably.

Written by Annukka Matilainen
Updated at November 2nd, 2026
Table of Contents
When an Apple device is outside its one-year Apple warranty, the customer may still be covered under consumer law. To claim a repair under consumer law, Apple needs a Consumer Law Claim (CLC) form, completed and uploaded with the repair in GSX. Fixably fills the form in for you from the order.
From version 26.44, the CLC form comes in two parts. The customer fills in and signs a customer page at check-in. The technician completes a technician page after the diagnosis. Fixably then combines both pages into one finalized CLC document, saves it on the order and emails it to the customer.
Prefer to watch? This 3-minute video follows one claim from check-in to the finalized form.
How the CLC form works
- Customer page, at check-in. The customer's details, the device, the reseller and the reported issue. The customer signs it, ideally on the Fixably Signature App together with the other check-in documents.
- Diagnosis. The technician confirms the defect and writes the diagnosis note.
- Technician page, with Finalize CLC form. The technician enters the inspection fee, the diagnosis and, for claims a reseller forwarded, the retailer. Fixably adds the technician's name, GSX Tech ID, signature and the date.
- Finalized CLC. Fixably adds one PDF, clc.pdf, with the customer page first and the technician page after it. The customer receives it by email.
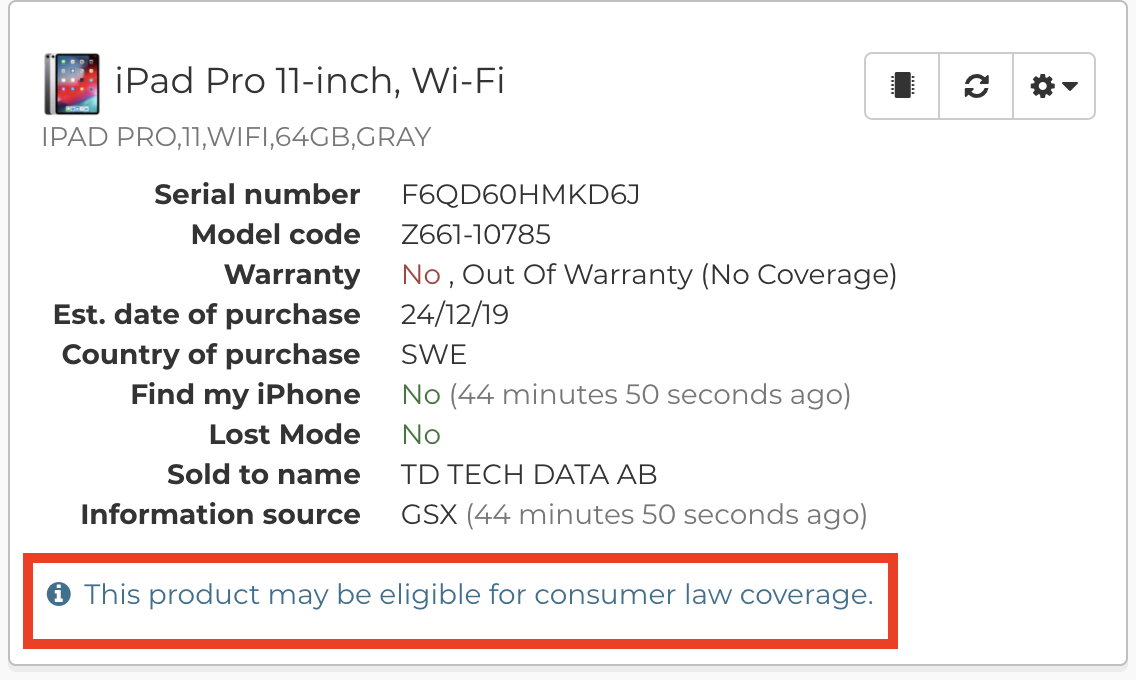
If a device is out of warranty, possible eligibility for consumer law coverage is shown in the device information section of the order.
Before you start
- GSX integration. The CLC buttons appear in Manage files only when your GSX integration has a Sold-To account.
- Permission. Staff who create or finalize CLC forms need the Create CLC file permission in Roles & Permissions.
- Technician details. The technician who validates the claim is the order's assigned technician. Each technician needs a GSX Tech ID (User settings → Integrations → GSX) and a saved signature (User settings → General → Signature, a PNG image). Without a GSX Tech ID the form can't be finalized.
- Check-in macro. To collect the customer page at check-in, your check-in macro needs the CLC customer page step (macro action clc.create). Contact Fixably Support to add it.
- Signing on a tablet. Signing the customer page on the Fixably Signature App needs the Paperless Advanced subscription feature and a paired signature terminal.
Step 1: Create the customer page at check-in
With the check-in macro
- Run your check-in macro as usual. When it reaches the CLC customer page step, Fixably has already filled in the form from the order:
- Device info: serial number, product description and date of purchase.
- Customer: name, phone number, email address, street address, postal code, city and country.
- Reported issue: taken from the order's issue notes.
- Type the Reseller Name as it is written on the proof of purchase. This is the only field Fixably can't fill in.
- Check every field with the customer. All fields are required, including the reseller. Then click Next.

Fixably adds clc-customer-page.pdf to the order's files. Each order has one customer page: if the order already has one, the step says so and doesn't create another. Finish that claim with Finalize CLC form instead.
Let the customer sign
When your macro has a signature step after the CLC step, the Consumer Law Claim is already ticked in Documents, next to the order authorization. Choose the signature terminal and click Next. The customer signs both documents on the tablet in one go.

The signed copy (signed-clc-<order number>.pdf) is saved on the order and attached to the email the customer receives after signing.
Without the macro step
Open the order, click the Files menu and choose Manage files. Click Create CLC form, check the prefilled details, enter the reseller, and fill in the technician part (inspection fee, retailer if a reseller forwarded the claim, diagnosis). Click Generate file. Fixably adds the customer page and the technician page as two separate files.

Step 2: Finalize the CLC after the diagnosis
- Make sure the order's diagnosis note describes the defect and that the order is assigned to the technician who validates the claim.
- Open the Files menu and choose Manage files. Because the order already has a customer page, the button now says Finalize CLC form. Click it.

- Fill in the technician page:

- Inspection Fee: tick it if you charge the customer an inspection fee.
- Retailer Name and Retailer Country: fill these in only when a reseller forwarded the claim to you. A retailer name ticks “Was this repair claim forwarded to you from a Reseller? Yes” on the technician page. For your own customers, leave Retailer Name empty and the form says No.
- Diagnosis: prefilled from the order's diagnosis note. It is required.
- Click Generate file.
Fixably adds two files to the order: clc-technician-page.pdf and the finalized clc.pdf. The finalized document contains the customer page (the signed copy, if the customer signed it) and the technician page. The original pages stay on the order unchanged. Upload clc.pdf with the proof of purchase when you create the repair in GSX.

The email to the customer
When you finalize the claim, Fixably emails the finalized CLC to the customer, in the customer's language, with clc.pdf attached. It goes to the email address the customer signed with, otherwise the order's contact email, otherwise the customer's email. The email is recorded as a note on the order's timeline.

The email uses the finalized-clc-form template. You can change its subject and text under System Settings → Email templates. If the order has no email address, or the email can't be sent, Fixably adds a note to the order explaining why, and the finalized CLC is still saved.
Troubleshooting
- I don't see Create CLC form or Finalize CLC form. Check that your GSX integration has a Sold-To account and that you have the Create CLC file permission. Create CLC form is disabled when the order has no device.
- Finalize CLC form doesn't save. Assign the order to a technician who has a GSX Tech ID in their user settings, and make sure the diagnosis is filled in.
- The technician's signature is missing on the technician page. Add a signature image under User settings → General → Signature for that technician.
- The macro step says the order already has a CLC form. The customer page was created earlier. Finish it from Manage files with Finalize CLC form.
- The macro step can't run automatically. The step needs the reseller name from a person, so it can't be used in automated macros.
- The form is in another language. Fixably uses Apple's CLC form for the customer's language. Check the language on the customer card.